3D Slicer: How to Turn Any STL Model into Interlocking Cardboard Structures
Hi! This is KUMIBOX.
We often talk about square boxes, but sometimes creativity demands organic shapes. Today, we are exploring the intersection of 3D modeling and cardboard engineering.
3D Slicer: How to Turn Any STL Model into Interlocking Cardboard Structures
Imagine you need to create a spectacular Point of Sale (POS) display shaped like a giant bottle, or maybe a decorative cardboard reindeer for a holiday window. You have the 3D model, but how do you build it out of flat sheets of corrugated board?
The answer is the “Waffle Structure” (or interlocking grid). It looks amazing and is incredibly strong. But manually drawing hundreds of intersecting slots in CAD? That is a nightmare that takes days. That’s why we built our free Slicer 3D tool.
1. From Virtual Solid to Physical Layers
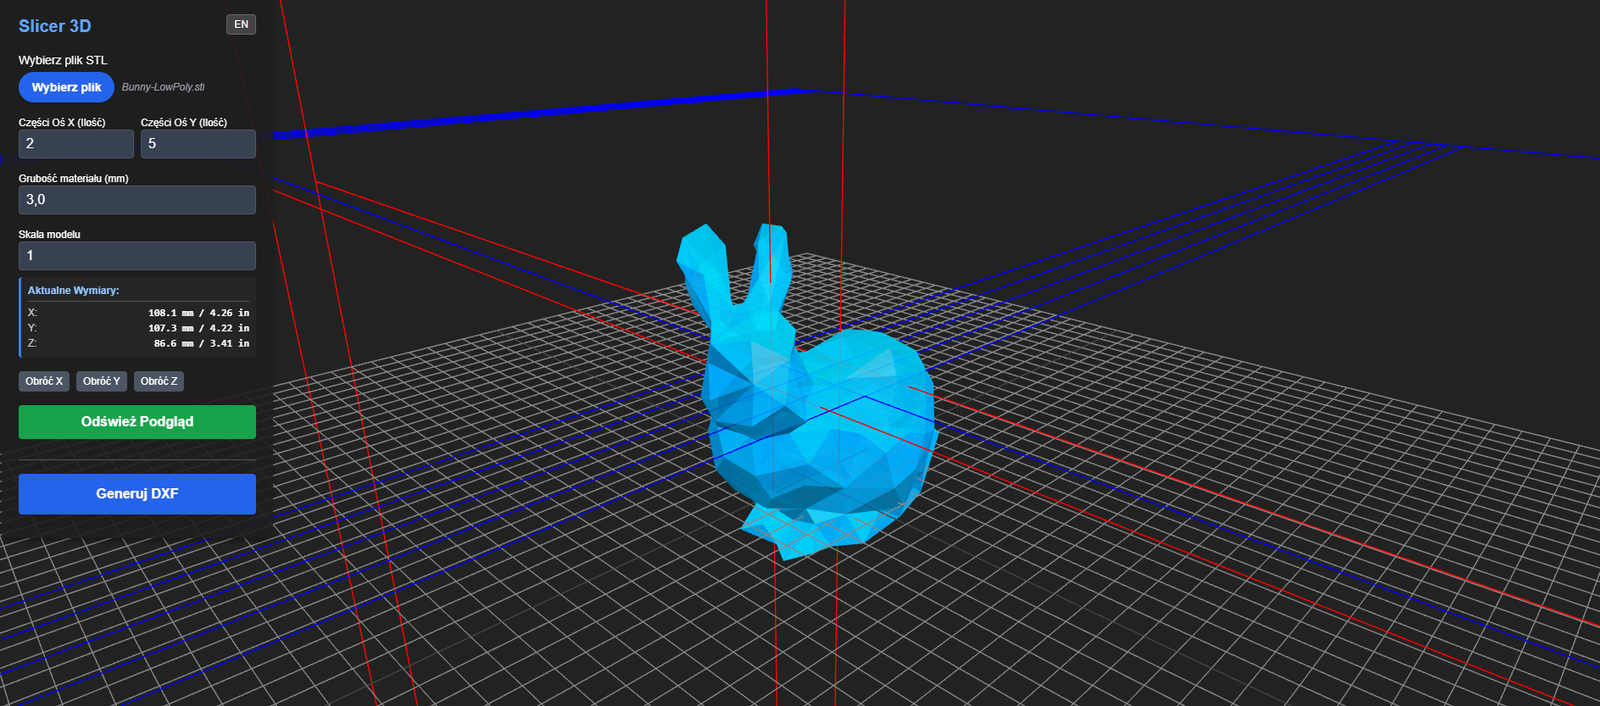
Usually, to create a grid structure, you need expensive plugins for architectural software. Our tool brings this capability directly to your browser for free. It takes a standard 3D file (STL) and slices it into interlocking X and Y planes.
How it works: Upload your .STL file. The algorithm analyzes the volume and automatically generates the cutting paths for horizontal and vertical slices, including the crucial connecting slots.
Within seconds, you go from a digital blob to a ready-to-cut construction kit.
2. Key Features for Packaging Designers
We designed this with the plotter table in mind. Here is what you can control:
- Material Thickness: This is the most important setting. If your cardboard is 3mm thick (B-flute), set this to 3mm. The tool will automatically adjust the slot width so the pieces fit together snugly without glue.
- Slice Density (X & Y): Want a detailed, high-resolution model? Increase the number of slices. Want a minimalist, abstract look? Reduce them.
- Scale & Rotation: Is your model too big for your plotter? Scale it down directly in the tool. You can also rotate the object to find the most stable orientation.
3. Pro-Tip: The “Slot Tolerance” Trick
Here is a tip from our workshop. When laser cutting or plotting cardboard, the material can sometimes compress or burn away slightly (kerf).
If your 3mm cardboard feels loose in a 3mm slot, try setting the “Material Thickness” in the tool to 2.8mm or 2.9mm. This creates a tighter “interference fit,” making your final structure rigid and sturdy without needing tape or hot glue.
4. Instant DXF Export & Editing
Once you are happy with the preview, hit “Generate DXF”. You get clean vector files ready for your Kongsberg, Zünd, or laser cutter.
Need further tweaks? You can take your generated DXF straight into Dielineo.com. It’s our dedicated online vector editor where you can clean up paths, add custom cutouts, or combine the slices with other packaging designs seamlessly.
Stop fighting with geometry. Upload your model and let the math do the hard work.
Remember: Even flat cardboard has a 3D soul.
Stay creative!
— The KUMIBOX Team
Leave a Reply
You must be logged in to post a comment.