Logipack: 3D Bin Packing Software to Master EU PPWR Regulations ▼
Hi! This is KUMIBOX. E-commerce logistics is changing. Shipping “air” in oversized boxes is no longer just a financial loss—it will soon be a regulatory violation. Today, we are diving into smart packaging optimization. Logipack: 3D Bin Packing Software to Master EU PPWR Regulations The EU’s Packaging and Packaging Waste Regulation (PPWR) is just around […]
Hi! This is KUMIBOX.
E-commerce logistics is changing. Shipping “air” in oversized boxes is no longer just a financial loss—it will soon be a regulatory violation. Today, we are diving into smart packaging optimization.
Logipack: 3D Bin Packing Software to Master EU PPWR Regulations
The EU’s Packaging and Packaging Waste Regulation (PPWR) is just around the corner, demanding strict limits on empty space ratio in e-commerce shipments. If your warehouse still relies on guesswork to pick shipping boxes, you risk compliance penalties and wasted resources.
That is why we built Logipack. It is an automated software solution designed to select the absolute best box for multi-item orders and streamline your dispatch process.

1. How Logipack Optimizes Your Warehouse
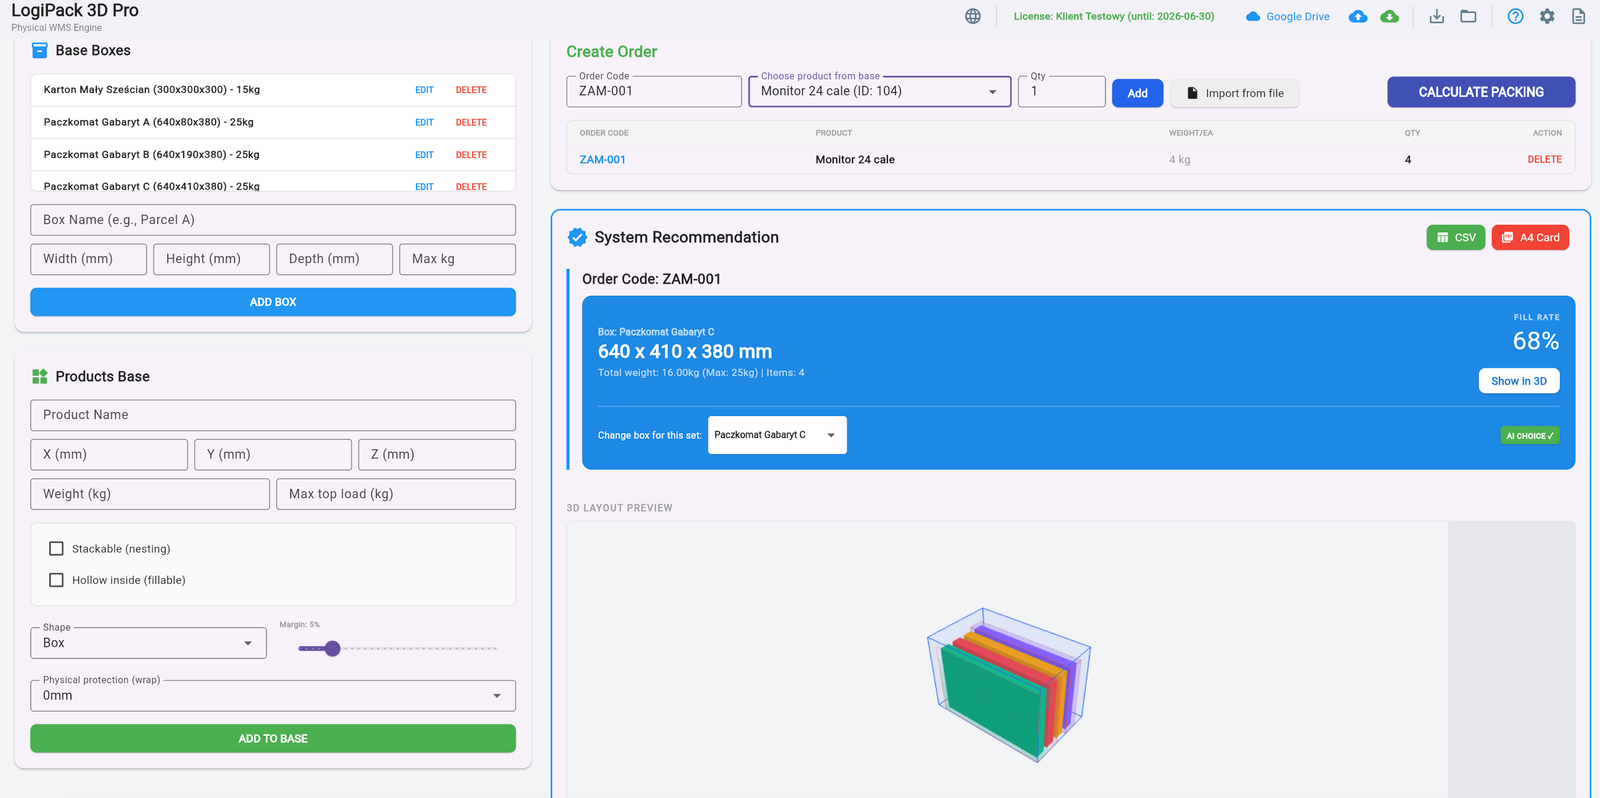
Imagine your company restricts its inventory to just 5 standard box sizes to save on procurement. When a customer orders a complex mix of products, finding the smallest possible box that fits everything is a geometric puzzle.
How it works: The system analyzes the volume and dimensions of the ordered goods. It instantly evaluates your predefined list of boxes and selects the one that maximizes fill rate. To complete the workflow, Logipack automatically generates the shipping labels.
2. Advanced Product Nesting
Real-world products aren’t always perfect cubes. We engineered Logipack to understand complex geometries, which is crucial for maximizing space.
- Smart Nesting: The algorithm recognizes when items can be stacked inside one another (like flower pots, buckets, or cones).
- Space Maximization: By calculating the nested dimensions, Logipack prevents unnecessary upgrades to larger boxes.
- Reduced Fillers: A tighter fit means less need for bubble wrap, void fill, or structural supports.
3. Ready for the PPWR Era
The upcoming PPWR mandates a maximum empty space ratio for transport packaging. Logipack transforms this legal requirement into a logistical advantage. By consistently picking the optimal box, you naturally comply with the law, reduce your carbon footprint, and significantly cut down on courier fees.
Stop guessing and start optimizing. Implement logic into your packing process today.
Remember: Every cubic centimeter of saved space is a win for your budget and the planet.
Pack smarter!
— The KUMIBOX Team
3D Slicer: How to Turn Any STL Model into Interlocking Cardboard Structures ▼
Hi! This is KUMIBOX. We often talk about square boxes, but sometimes creativity demands organic shapes. Today, we are exploring the intersection of 3D modeling and cardboard engineering. 3D Slicer: How to Turn Any STL Model into Interlocking Cardboard Structures Imagine you need to create a spectacular Point of Sale (POS) display shaped like a […]
Hi! This is KUMIBOX.
We often talk about square boxes, but sometimes creativity demands organic shapes. Today, we are exploring the intersection of 3D modeling and cardboard engineering.
3D Slicer: How to Turn Any STL Model into Interlocking Cardboard Structures
Imagine you need to create a spectacular Point of Sale (POS) display shaped like a giant bottle, or maybe a decorative cardboard reindeer for a holiday window. You have the 3D model, but how do you build it out of flat sheets of corrugated board?
The answer is the “Waffle Structure” (or interlocking grid). It looks amazing and is incredibly strong. But manually drawing hundreds of intersecting slots in CAD? That is a nightmare that takes days. That’s why we built our free Slicer 3D tool.
1. From Virtual Solid to Physical Layers
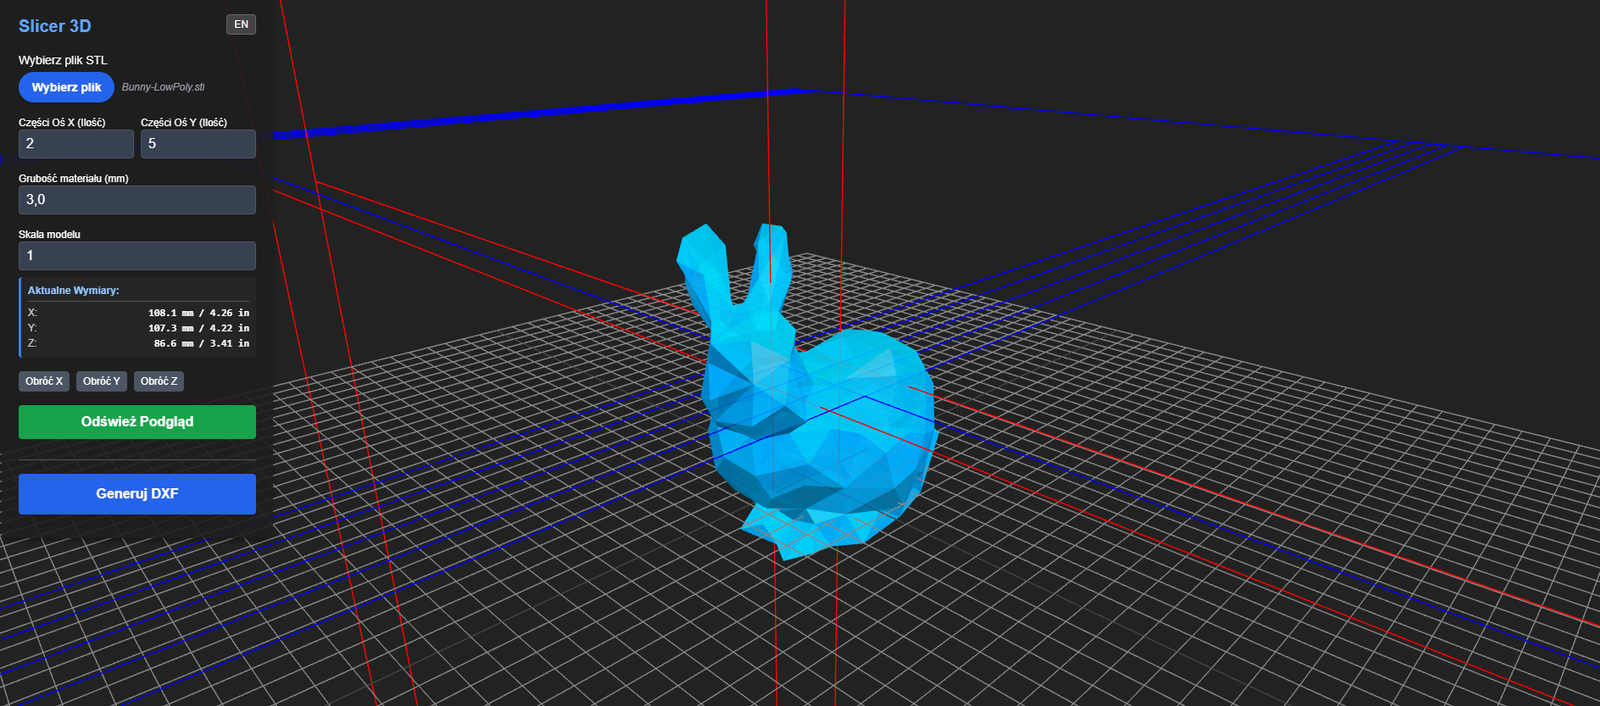
Usually, to create a grid structure, you need expensive plugins for architectural software. Our tool brings this capability directly to your browser for free. It takes a standard 3D file (STL) and slices it into interlocking X and Y planes.
How it works: Upload your .STL file. The algorithm analyzes the volume and automatically generates the cutting paths for horizontal and vertical slices, including the crucial connecting slots.
Within seconds, you go from a digital blob to a ready-to-cut construction kit.
2. Key Features for Packaging Designers
We designed this with the plotter table in mind. Here is what you can control:
- Material Thickness: This is the most important setting. If your cardboard is 3mm thick (B-flute), set this to 3mm. The tool will automatically adjust the slot width so the pieces fit together snugly without glue.
- Slice Density (X & Y): Want a detailed, high-resolution model? Increase the number of slices. Want a minimalist, abstract look? Reduce them.
- Scale & Rotation: Is your model too big for your plotter? Scale it down directly in the tool. You can also rotate the object to find the most stable orientation.
3. Pro-Tip: The “Slot Tolerance” Trick
Here is a tip from our workshop. When laser cutting or plotting cardboard, the material can sometimes compress or burn away slightly (kerf).
If your 3mm cardboard feels loose in a 3mm slot, try setting the “Material Thickness” in the tool to 2.8mm or 2.9mm. This creates a tighter “interference fit,” making your final structure rigid and sturdy without needing tape or hot glue.
4. Instant DXF Export & Editing
Once you are happy with the preview, hit “Generate DXF”. You get clean vector files ready for your Kongsberg, Zünd, or laser cutter.
Need further tweaks? You can take your generated DXF straight into Dielineo.com. It’s our dedicated online vector editor where you can clean up paths, add custom cutouts, or combine the slices with other packaging designs seamlessly.
Stop fighting with geometry. Upload your model and let the math do the hard work.
Remember: Even flat cardboard has a 3D soul.
Stay creative!
— The KUMIBOX Team
Leave a Reply
You must be logged in to post a comment.
Packaging Calculator: How to Optimize Master Carton Dimensions for Pallets ▼
Hi! This is KUMIBOX. Usually, we are busy coding algorithms or designing die-cut lines. But today, we want to share a story from the warehouse floor that might save your next shipment from disaster. The “2-Centimeter” Nightmare: Master Carton Dimensions & Pallet Optimization We recently spoke with a production manager who was launching a new […]
Hi! This is KUMIBOX.
Usually, we are busy coding algorithms or designing die-cut lines. But today, we want to share a story from the warehouse floor that might save your next shipment from disaster.
The “2-Centimeter” Nightmare: Master Carton Dimensions & Pallet Optimization
We recently spoke with a production manager who was launching a new cosmetic line. He had the perfect product, but when the first pallet arrived at the warehouse, it was unstable. Why? Because the master carton was designed “just to fit the product,” without thinking about the pallet.
The result? A 50mm overhang on the pallet that risked fines from the carrier, or a 100mm gap that meant shipping “air.” That’s why we built the Packaging Calculator PRO 4.0—to bridge the gap between the product designer and the logistics manager.
1. Master Carton Design: From Product to Pallet
Most people guess box dimensions. They measure the product, add a little bit for “wiggle room,” and order the box. This tool flips the script. It calculates the optimal arrangement of your items to fit the pallet perfectly before you order the cardboard.
What it does: You input your single item’s size, and the Calculator tests thousands of combinations (rotating the item, changing wall thickness) to find the master carton size that maximizes your pallet efficiency.
It’s not just about fitting things in a box; it’s about fitting the box into the world.
2. The Corrugated Cardboard Thickness Factor
Here is a detail often missed: Cardboard thickness.
A standard C-flute wall adds about 4mm. In a master carton, that adds up. Our tool lets you select the exact flute type (E, B, C, BC, etc.).
- Precision: If you switch from B-flute to BC-flute for strength, your outer dimensions change. The tool updates this instantly.
- Weight Calculation: It calculates the weight of the cardboard itself based on grammage. No more surprises on the scale.
3. BCT Calculator: Box Compression Test for Logistics
This is the feature that serious logistics pros love. It’s not enough for the box to fit; it must not crush.
At the bottom of the tool, you will see the Strength (BCT) Calculator. It estimates if your bottom box can handle the weight of the stack above it.
Why use this?
- Save Money: Stop buying expensive 7-layer cardboard for light loads.
- Avoid Damage: Ensure your boxes won’t collapse in a humid warehouse (we even included a “Safety Factor” selector for humidity and export conditions!).
Knowing your required BCT (Box Compression Test) score is the difference between a pristine delivery and a crushed return.
4. Optimize Your Packaging & Pallet Layout
Whether you are an e-commerce seller figuring out how to bundle items or a logistics manager planning a container, this tool is your quick sanity check.
Don’t let 2 millimeters ruin your pallet plan. Check the dimensions, check the strength, and ship with confidence.
Remember: Great logistics starts with the smallest box.
Stay strong!
— The KUMIBOX Team
Calculate Your Optimal Pallet Layout in Seconds! ▼
Hi! This is KUMIBOX. Day to day, we support logisticians, warehouse managers, and shippers by digging through load plans and transport standards to find ideal solutions. Today, however, we’re stepping out of our role to talk to you as a colleague from the industry. Pallet Layout Calculator: Optimize Truck & Container Transport in Seconds “How […]
Hi! This is KUMIBOX.
Day to day, we support logisticians, warehouse managers, and shippers by digging through load plans and transport standards to find ideal solutions. Today, however, we’re stepping out of our role to talk to you as a colleague from the industry.
Pallet Layout Calculator: Optimize Truck & Container Transport in Seconds
“How many pallets can I really fit on this truck?” “Am I wasting space (and money) on this container shipment?” “What’s the most efficient way to load this mix of EU and US pallets?” We hear this all the time!
While KUMIBOX is known for its powerful packaging design tools, we’re obsessed with the entire logistics chain. That’s why we built our new Pallet Layout & Transport Optimization Wizard—a simple tool to solve your most complex loading problems.
1. Truck & Container Load Optimization
We’re going to show you how to stop playing “Tetris” in your head (or on a spreadsheet) and get a precise, visual load plan in under 30 seconds. This tool is designed for real-world scenarios: trucks, vans, and sea containers.
In this quick guide: You’ll see how to instantly calculate layouts for different vehicles, mix pallet types, and get a visual plan to make loading faster and more efficient.
Why it matters: This isn’t just about fitting one more pallet. It’s about reducing transport costs, cutting fuel consumption, and eliminating the expensive guesswork that leads to half-empty trucks.
2. How to Use the Pallet Layout Wizard
We designed the tool to be fast. No sign-up, no complicated manuals. You can get your answer in three simple steps:
- Select Your Vehicle: Choose from standard trucks, buses/vans, or sea containers (20ft, 40ft).
- Enter Your Pallets: Add your pallet types (e.g., EU, US, Industrial) and quantities.
- Calculate! Instantly see the optimal, visualized layout and the total number of pallets that fit.

3. Pro-Tip: Axle Weight Limits & Multi-Stop Delivery Planning
One key technique that separates pros from amateurs is planning for more than just maximum capacity. It’s a critical pro-tip for real-world transport.
Here’s why it’s so important:
- Avoid Overloads: A rookie loads for 100% space. A pro loads for 100% legal weight. Fitting 26 pallets is useless if it puts you over the axle weight limit. Always know your weight before you load.
- Plan for Unloading: Is this a multi-stop delivery? The pallets for the last stop must be loaded first. Planning your layout visually helps you arrange the load for efficient unloading, not just loading.
- Mix Strategically: Our tool lets you mix pallet types. This is key. You can often fit more by strategically combining, for example, two US pallets with one EU pallet to fill a gap.
Loading a truck based on a “best guess” is a recipe for wasted fuel and costly delays.
4. Launch the Free Pallet Layout Calculator
The best way to learn is by doing. We’ve made this tool free and available for everyone. Open it, plug in your next shipment, and see how it works.
Follow the simple steps, and don’t forget to think about weight distribution and access!
Remember: From the individual box design to the fully loaded truck, KUMIBOX has the tools to help you optimize every step.
Stay strong!
— The KUMIBOX Team
Leave a Reply
You must be logged in to post a comment.
Let’s Draw a 3D Christmas Tree in Dielineo! ▼
Hi! This is KUMIBOX. Day to day, we support designers by digging through specifications and standards to find ideal solutions. Today, however, we’re stepping out of our role to talk to you as a colleague from the industry. Let’s Draw a 3D Christmas Tree in Dielineo! “I want to design a custom shape, not just […]
Hi! This is KUMIBOX.
Day to day, we support designers by digging through specifications and standards to find ideal solutions. Today, however, we’re stepping out of our role to talk to you as a colleague from the industry.
Let’s Draw a 3D Christmas Tree in Dielineo!
“I want to design a custom shape, not just a standard box.” “But how do I start? Is drawing a custom die-line from scratch in Dielineo complicated?” We hear this often!
While Dielineo is famous for its instant library of FEFCO and ECMA standards, it’s also a powerful vector tool for your own creations. Today, we’re going to guide you step-by-step through drawing a simple, slot-together 3D Christmas tree. It’s a perfect beginner project!
1. The Project: A Slot-Together Tree
We’ll be drawing two simple tree profiles that interlock using slots. This is a common technique for point-of-sale (POS) displays, prototypes, and decorative items. It’s a fantastic way to learn the basic drawing and modification tools in Dielineo.
In this tutorial: You’ll learn how to use basic drawing tools, align objects, and create precise slots for assembly. We’ll also cover a key pro-tip for making your designs production-ready.
Why it matters: This project teaches you the fundamentals of custom vector drawing within Dielineo. It opens the door to creating any shape you can imagine, from custom inserts to complex displays, all within one application.
2. Get Your Resources Ready
To make it easy, we’ve created two resources for you. You can watch the video to see the entire process, or download the PDF to inspect the final die-line yourself.
- Watch the Video: See every click in our step-by-step YouTube tutorial (in the next section).
- Download the PDF: Get the finished die-line to see the final dimensions and construction.

3. See How Simple It Is
The video below walks you through the entire process, from a blank canvas to a finished 3D tree die-line in Dielineo. We’ll show you every tool and every click.
4. A Pro-Tip: Rounding Your Slots
One key technique we’ll teach you in this video is rounding the corners of the interlocking slots. It might seem like a tiny detail, but it’s a critical pro-tip for real-world production.
Here’s why it’s so important:
- Easier Stripping (Cleaning): When a die-cutter punches this shape, the small piece of waste (the “slug”) from the slot must be removed. This is called stripping or cleaning.
- Prevents Jamming: Rounded corners allow the waste slug to be pushed out cleanly and efficiently. Sharp 90-degree corners can cause the waste to jam in the die, slowing down or stopping the entire production run.
- Better Durability: Sharp internal corners are weak points. A slight radius reduces the risk of the material tearing during assembly or use.
Learning this small trick makes your die-lines far more professional and manufacturing-friendly.
Sharp, un-rounded internal slots are a recipe for production headaches.
5. Download the PDF & Try It Yourself
The best way to learn is by doing. We’ve made the final die-line available as a PDF download. Open it, inspect how it’s built, and try drawing it yourself in Dielineo.
Follow along with the video, and don’t forget to practice the slot-rounding technique!
Remember: Dielineo is a powerful tool for both standard (FEFCO/ECMA) boxes and your own custom creations.
Stay creative!
— The KUMIBOX Team
Leave a Reply
You must be logged in to post a comment.
Dielineo. Draw Your First Packaging. It’s Easier Than You Think. ▼
Hi! This is KUMIBOX. Day to day, we support designers by digging through specifications and standards to find ideal solutions. Today, however, we’re stepping out of our role to talk to you as a colleague from the industry. Draw Your First Packaging: It’s Easier Than You Think with Dielineo “I want to design a box.” […]
Hi! This is KUMIBOX.
Day to day, we support designers by digging through specifications and standards to find ideal solutions. Today, however, we’re stepping out of our role to talk to you as a colleague from the industry.
Draw Your First Packaging: It’s Easier Than You Think with Dielineo
“I want to design a box.” “But how do I start? Is drawing a die-line from scratch complicated?” Before we waste half an hour drawing lines and figuring out flaps, you just need to do one thing: “Use Dielineo“.
The answer lies in ready-made standards and the right tools. Dielineo is an application that gives you instant access to a library of ready-to-use packaging die-lines.
1. What is Dielineo? (Your Packaging Dieline Generator)
Simply put, Dielineo is your digital die-line catalog. Instead of manually drawing every cut and crease line, you simply select a ready-made, parameterized design from a library based on international standards like FEFCO or ECMA.
In practice: You choose a standard (e.g., FEFCO 0201 or 0452), enter your dimensions (Length, Width, Height), and the application generates a ready PDF, DXF, or HPGL file in seconds. No errors, no guesswork.
Why it matters: It radically speeds up work, eliminates construction errors, and allows you to focus on what’s most important – designing graphics and selecting the right material.
2. Generate FEFCO & ECMA Standards in 3 Steps
Going from idea to a finished die-line has never been easier. Here’s how it works:
- Step 1: Choose a standard: Browse the library and select the construction that interests you (e.g., a classic slotted box, a “pizza box” style folder, or a telescopic box).
- Step 2: Enter dimensions: Provide the internal L x W x H dimensions you need, and optionally the material thickness.
- Step 3: Download the die-line: Click “Generate” and download the ready vector file, perfectly prepared for further graphic design work in Adobe Illustrator or for sending to a cutting plotter.

3. See How Simple It Is
The video below shows how to generate a fully professional die-line for a FEFCO 0201 folder box in less than a minute.
4. The Die-line is Just the Beginning
A ready-made die-line from Dielineo is your “map”. It tells you how the packaging will be folded and cut, but not what it’s made of.
- It doesn’t specify the board type (e.g., 3-ply or 5-ply).
- It doesn’t define the paper composition (e.g., Kraftliner or Testliner).
- It doesn’t specify the strength (e.g., ECT or BCT).
Ordering a die-line without a board specification (e.g., “B-flute, 450 g/m², ECT 5.5 kN/m”) is incomplete when thinking about production.
That’s a recipe for misunderstanding.
5. How to Use It
As designers, we use Dielineo as an absolute starting point. It’s our “alphabet generator”. It allows us to instantly establish the basic construction with the client and prepare the file for graphics.
Only then do we apply our engineering knowledge to this base: selecting the right flute profile, grammage, and raw material to ensure the packaging meets specific strength and logistical requirements.
Remember: Dielineo gives you the shape. Strength (ECT/BCT) is the message you convey with it.
Stay strong!
— The KUMIBOX Team
Leave a Reply
You must be logged in to post a comment.
Stop Explaining Box Designs: How the FEFCO Code Solves Your Biggest Communication Problem ▼
Hi! This is KUMIBOX. Day to day, we support designers by digging through specifications and standards to find ideal solutions. Today, however, we’re stepping out of our role to talk to you as a colleague from the industry. The FEFCO Catalogue: Why This Code is the COMMON LANGUAGE of the Packaging Industry “I need a […]
Hi! This is KUMIBOX.
Day to day, we support designers by digging through specifications and standards to find ideal solutions. Today, however, we’re stepping out of our role to talk to you as a colleague from the industry.
The FEFCO Catalogue: Why This Code is the COMMON LANGUAGE of the Packaging Industry
“I need a regular slotted container.” “Which one? An overlap? A telescopic box?” Before we waste half an hour defining what a “regular box” is, you just need to say one thing: “FEFCO 0201“.
The answer lies in standardization. The FEFCO code is the international language of the corrugated packaging industry.
1. What is the FEFCO Code?
Simply put, the FEFCO Code is an internationally recognized system for classifying corrugated packaging designs. It was developed in the 1960s by FEFCO (European Federation of Corrugated Board Manufacturers) and ESBO to avoid misunderstandings when communicating in different languages.
In practice: It’s a four-digit symbol (e.g., 0201, 0427, 0713) assigned to a specific, universal packaging design. Instead of sending complex descriptions and drawings, you just provide the code, and every manufacturer knows exactly which construction is needed.
Why it matters: It simplifies identification, speeds up quotes, and eliminates errors in orders. It’s the foundation of communication between the designer, production, and the client.
2. The Main FEFCO Code Categories
The FEFCO catalogue groups designs into series, each with specific characteristics. Here are the most important ones:
- 0100 Series: Commercial rolls and sheets.
- 0200 Series: Slotted boxes (e.g., the classic RSC – FEFCO 0201). Usually one piece with top and bottom flaps.
- 0300 Series: Telescopic boxes. Consist of more than one piece (e.g., lid and bottom) fitting over each other.
- 0400 Series: Folder boxes and trays. Usually made from one piece of board, the bottom is hinged to form walls and the cover.
- 0500 Series: Slide boxes. Consist of several pieces (liners and sleeves) sliding into each other.
- 0600 Series: Rigid boxes. Consist of two separate end pieces and a body, requiring stitching or a similar operation.
- 0700 Series: Ready-glued cases. Usually one-piece, shipped flat and ready to use by simple assembly.
- 0900 Series: Interior fitments (liners, pads, partitions, dividers, etc.).
3. It’s More Than Just a Number
The FEFCO code isn’t just about boxes. It also defines how dimensions are specified (internally by default: Length (L) x Width (W) x Height (H)), line symbols (solid for cutting, dashed for creasing), and even jointing methods (e.g., glued, stitched).
4. The Catch — FEFCO Code Isn’t Everything
The code FEFCO 0201 alone doesn’t define the most important thing: strength. It tells us how the box is built, but not what it’s made of.
- It doesn’t specify the board type (e.g., 3-ply or 5-ply).
- It doesn’t define the paper composition (e.g., Kraftliner or Testliner).
- It doesn’t specify the strength (e.g., ECT or BCT).
Ordering a “FEFCO 0201” without a board specification (e.g., “B-flute, 450 g/m², ECT 5.5 kN/m”) is incomplete.
That’s a recipe for misunderstanding.
5. From FEFCO Code to Instant Quote
As designers, we use the FEFCO catalogue as a starting point. It’s our ‘alphabet.’ It allows us to instantly establish the basic construction with the client.
Only then do we apply our engineering knowledge to this base: selecting the right flute profile, grammage, and raw material to ensure the packaging meets specific strength and logistical requirements.
That is exactly why we built CalcPack.com. It allows you to take any FEFCO standard, pair it with specific cardboard parameters, and generate an instant, highly precise pricing calculation.
Remember: FEFCO is the language we speak. Strength (ECT/BCT) is the message we convey with it.
Stay strong!
— The KUMIBOX Team
Leave a Reply
You must be logged in to post a comment.
Beyond the Spec Sheet: The Real-World Guide to BCT, ECT, and Pallet Safety ▼
We all know that corrugated board is a brilliantly simple material. But how do we really know that the packaging we’re sending to production will withstand the rigors of transit? How can we be sure that our pallet of goods won’t turn into a crush zone somewhere in a client’s warehouse?
Hi! This is KUMIBOX.
Day to day, we support designers by digging through specifications and standards to find ideal solutions. Today, however, we’re stepping out of our role to talk to you as a colleague from the industry.
Corrugated Board Quality Testing: BCT, ECT, and Why It’s the FOUNDATION of Your Packaging
Corrugated board is a brilliantly simple yet mechanically sophisticated material. But how can we be sure that packaging will survive transport and stacking? That your pallet of goods won’t collapse somewhere in the client’s warehouse?
The answer lies in testing — specifically in two fundamental parameters: BCT and ECT.
1. ECT (Edge Crush Test) — Strength of the Material
ECT measures the compressive strength of corrugated board parallel to the flutes. It’s a destructive test that tells us how strong the raw material is.
In practice: A small sample (100 × 25 mm) is cut, placed on edge (flutes vertical), and compressed from the top until it fails. The force needed to crush it — measured in kN/m — gives the ECT value.
Why it matters: The vertical flutes carry the majority of the load. A higher ECT means a stiffer board — and a stronger box structure overall.
2. BCT (Box Compression Test) — Strength of the Finished Box
BCT measures how much compressive load a finished box can withstand before collapsing. If ECT is about the “brick,” BCT is about the entire “house.”
In practice: A finished, glued, empty box is placed under a hydraulic press that compresses it from the top until the walls buckle. The maximum load before collapse (in kg or N) is the BCT value.
Why it matters: This is the number that determines stacking strength and warehouse safety. It answers the question: how many layers can be safely stacked on a pallet?
3. The McKee Formula — Connecting ECT and BCT
The McKee formula allows us to predict BCT based on measurable board parameters — eliminating the need to test every prototype.
- ECT (material strength)
- Board thickness (e.g., 3 mm for B-flute, 4 mm for C-flute)
- Box perimeter (2L + 2W)
With these inputs, we can calculate expected box compression strength and choose raw materials accordingly — optimizing for both performance and cost.
4. The Catch — Lab BCT ≠ Real-World BCT
A lab test gives ideal numbers — but real-world conditions reduce strength dramatically. Here’s what affects it:
- Humidity: Corrugated absorbs moisture. High humidity can reduce BCT by up to 60%.
- Storage time: Compression strength decreases over time as material “creeps.”
- Palletization pattern: Interlocking stacking reduces strength vs. column stacking.
- Pallet overhang: Even 1 cm overhang drastically lowers load-bearing capacity.
A lab result of 300 kg might translate to only 120 kg after a month in humid warehouse conditions — well below the intended load.
That’s a recipe for failure.
5. Designing for Real Conditions
Designers must include safety factors accounting for humidity, time, stacking pattern, and palletization. Manual calculation is complex — but essential.
Modern palletization software bridges theory and practice — it simulates real-world conditions using actual BCT data. That’s the only way to ensure structural safety and packaging efficiency.
Remember: ECT and BCT are not just numbers. They are the language of packaging performance and safety.
Stay strong!
— The KUMIBOX Team
Leave a Reply
You must be logged in to post a comment.
Leave a Reply
You must be logged in to post a comment.